
I know that many of my clients and readers wonder if pond cleaning is something that they can do on their own. I would say that it is entirely possible for homeowners to clean their own pond. The question is, do they want to clean their own pond? If you are the type of person who tries to avoid getting dirty and is repulsed by strong smells, then pond cleaning is definitely not for you. This can be one of the stinkiest, messiest jobs that we do. Believe me, we have our share of experience in pond cleaning. We clean approximately 100 ponds every spring all over Southeastern Wisconsin. The job is typically cold, wet, muddy and stinky. So, it is absolutely possible for you to clean your own pond. Are you up for it?
Here we go, step by step instructions for the do it yourself pond cleaner.
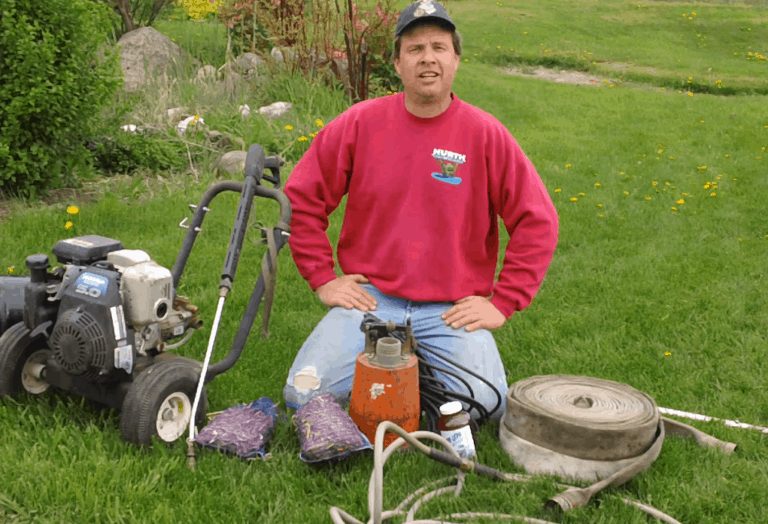
First, a list of tools that you’ll need or want:
- Rubber boots – the taller the better.
- Rubber gloves – once again the taller the better.
- Safety glasses – don’t want any of that pond mud to get in your eyes while pressure washing.
- Running water and a hose.
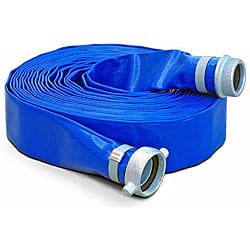
- Clean out pump and discharge hose – usually a solids handling industrial style pump.
- Pressure washer – any variety will do, the more pressure, the cleaner the rocks.
- Net – to skim debris and catch fish.
- Tank – to keep the fish in while you clean.
- Net – to put over the tank so that the fish don’t jump out.
- Aerator – to put in the tank with the fish, depending on weather and time in the tank.
- Buckets – to collect debris and maybe help collect fish.
- Bacteria and Enzymes – to add to the water when you are done.
- De-chlorinator – to add to the water if you have city water before you add the fish.
- Barley bales – to put in the pond when you are done to help control algae.
- Your pond pump – to install at the end to make your waterfall run.
A few words before we begin
I will describe to you the exact methods that we use to clean all of the ponds that we care for every spring. I’m sure that different people do things differently, so feel free to do it your own way. This is the way that has worked best for us over the years. We usually clean fully lined, naturally balanced eco-system ponds with rock, gravel, fish and plants in them. If you don’t have any of these things, the job should be similar, just a bit different. Remember, we are located in Southeastern Wisconsin. Some of these techniques, especially when dealing with fish, may be a bit different for different climates. Also, please note that this is a full clean out that I will be describing, there are many variations on this clean and it can be modified to fit your needs and wants.
Step One – Prepare Yourself
Before you throw a pump in the pond, prepare yourself. Get all of your tools together pond side. Hook up your hose, get the fish tank on a nice level area, hook up your pressure washer, etc. The more prepared and organized you are, the smoother this will go.
Step Two – Empty The Pond
Don’t go walking around in your pond and stir up all of the debris, it just makes it harder on you and your fish. Attach your clean out pump to it’s discharge hose and put it in the pond. Put the pump near the edge of the pond on one of the upper shelves or on top of a rock for now. We want to use the first of the water that we pump out of the pond to fill the tank for the fish, so we want it to be from higher up in the pond where the water is generally a bit cleaner.
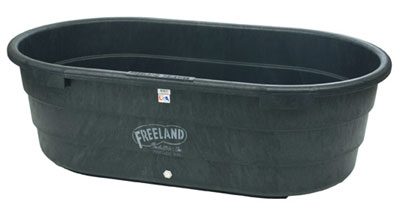
The fish storage tank should be placed in the shade in a nice level spot. If your pond is very tiny and your pump is very large, be careful. You may find yourself with an empty pond and unhappy fish real quick.
Once the tank for your fish is full of pond water, you can discharge the remaining water elsewhere. This pond water is full of nutrients, so it is good for watering plants. We usually just pump it out onto the lawn or into a flower bed downhill from the pond. You will be pumping out some pretty dirty water, so I wouldn’t pump it to an area where everyone walks.
While the pond is emptying, you will have some time to pull the filters out of your biofalls (waterfall box) and skimmer (pump box) if your pond is equipped with these. It may work well to initially rinse these filters out with the pond water being discharged from the pond depending on what type of clean out pump you have.
As the water is pumped from the pond, keep an eye on your pump. It will need to be moved to the deepest area of you pond as the pond is drained. The pump will suck the debris from the pond bottom into it’s intake, so it will need to be cleaned. It is worthy of note at this time that these are powerful pumps and they don’t discriminate between leaves, rocks, dirt, fish, fingers or tad poles, so be careful not to suck up anything important. If you are using a wimpy little pump, this will make your pond clean out take forever. The pump will constantly clog and you will get nowhere. If you are going to clean your pond regularly, buy a decent pump, it will be worth it.

This is probably the most important tool that you will buy for cleaning your pond. It will make or break you. Cheap pump = all day unclogging pump. Quality pump = all day cleaning pond.
As the water is pumped from the pond, you also need to keep an eye on the fish. They would prefer to be taken out of the pond prior to the time when there is no water left. I usually wait until there is still enough water for them to swim, but just barely. This makes them easy to catch. If you have never tried to catch fish out of your pond before, you are in for a real treat, those things are fast! Depending on the construction of your pond, there may be many hiding places for your fish. Be sure that you have a general idea of how many fish are in the pond before you begin. It is common to have fish hide behind the rocks, in a fish cave or under a plant. Usually they are found during the clean out process and do just fine, but sometimes they are not so lucky. At least be sure to make note of your favorite fish to be sure that you got them out. I usually try to get the frogs out of the pond also, but they are typically even less cooperative than the fish and they never want to stay where you put them anyway, so instead, I end up just trying not to pressure wash them.
Step Three – Begin to Clean
Now that we have an empty pond and a tank full of happy fish, we can begin the real work. Notice that his section is not entitled pressure wash. The beginner always wants to get that pressure washer going right away, this is a mistake. Resist the temptation. What may seem like saving a step, turns into all of the debris being chopped up into tiny pieces which are much harder to remove from the pond. Take your bucket, start at the top and remove all debris. Trim away any dead plant material, pick out any dead frogs or fish that didn’t make it through the winter, pick out all branches, twigs, etc. This is also a great time to remove any plants that may be growing where you don’t want them to grow. Every year I remove some of my rushes and cattails. They tend to grow quickly and spread, so they are great at removing nutrients form the water, but they do need to be kept in check. To remove the well established pond plants, you’ll probably need to remove some of the rock and gravel that the roots are buried in. Usually I am able to just work my hand under the root mass or in between some of the plants and rip them out, but occasionally I’ve needed to resort to cutting the roots. If you need to cut the roots, I’d use an old pruning shears. If you use a knife or a shovel, you could easily cut the liner, so an old pruner works well. Use an old pruner, because you will certainly be cutting through gravel as you cut the roots. You can also use your pressure washer to cut through stubborn plant roots. This technique works really well, but it makes quite a mess.
Step Four – Rocks and Gravel
Once I have removed most of the debris, dead plant material and live plant material that I don’t want, I re-stack any rock that may have fallen out of place or shifted over the past year. I also take the excess gravel, which always seems to end up on the bottom of the pond, and I redistribute it to the thinning or bare rubber areas on the upper shelves. Over the course of a year or two, the pond gravel seems to move a bit. I’m sure that we move it when we walk in the pond, the fish move it as they forage for their food, the water movement often moves it out of the high flow areas and the ice moves it also. In any event, we really only want about an inch or maybe two of gravel covering the rubber. Keeping it thin keeps it clean. The fish can dig around in the gravel for food, but they only affect the top inch or so. When your gravel is too deep, oxygen can’t get down to the bottom, the bacteria don’t do well and these deep gravel areas just turn black, stinky and mucky. Definitely not what we are looking for. Moving the gravel and re-arranging the rocks at this point may seem to be too early in the clean out process for some people. What we’ve found is that by doing this work prior to the pressure washing, we are uncovering any hidden pockets of yuck and debris and we are exposing more gravel to the washer. Sure, you’ll need to move some gravel around again after the pressure washing is complete, but you shouldn’t need to do much.
Step Five – Pressure Wash
All right, here is the step that you all have been waiting for. We get to try out the pressure washer! Before you fire it up, I’d like to give you a few words of warning. Pressure washing can be very dirty and dangerous work.
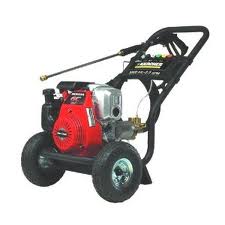
Water under extreme pressure can push into flesh, can cut, can remove paint from houses and cars, can remove wood from decks, can kill fish and frogs and will surely tear up any aquatic plants that get in the way. Depending on the weather, you may want to wear a rain suit to keep dry. Especially as rookie, you will end up wet and muddy. You will always want to wear safety glasses and hearing protection. The motors get pretty loud and long-term exposure may damage your hearing, and there will be algae, mud, dirt, rock chips and anything else that gets in the way flying through the air ready to get lodged in your eye.
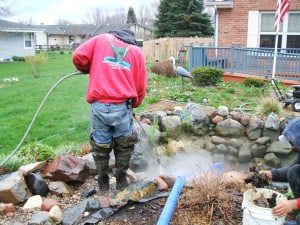
Oh, another word of caution, when pressure washing, it is always a good idea to keep your mouth closed! Just work from the top of the pond down to the bottom, pressure washing each rock and lightly pressure washing the gravel. Even though we’ve previously removed the debris from the pond, you’ll be surprised at how much new debris the pressure washer will turn up. Some of the rocks will come cleaner than others, and some ponds in general come cleaner than others. I’m not sure why, but it seems that different types of water and different types of rock react differently. Take your time and do a nice job. This is probably the easiest step in your clean out. Be careful around plants. We usually try to avoid hitting the plants at all because the pressure washer will tear them up and really set them back. Also, please be careful for those precious frogs that are sure to come jumping out of their hiding places between the rocks.
Step Six – Wash Down
Once you are satisfied with your pressure washing, it is time to wash down the pond one last time. Just take the garden hose and begin washing from the top down. You will be able to pick out more debris as you do this, so keep your bucket nearby. You will end up with a nice clean pond except for the very bottom. This is where that industrial clean out pump really pays for itself. Make sure that the pump is in the lowest area of the pond and keep washing the muck and debris down toward the pump. Stop regularly to pull any debris that may be impeding the water flow into the pump. With our pumps, it usually works best to lift the pump up out of the water, which breaks the suction and makes the debris easy to remove. Each time you lift the pump you’ll end up with a handful of debris that was sucked up against the screen. Continue washing the pond down until you feel you have removed most of the debris and yuck. Don’t worry about getting it all, that would be impossible and your pond will balance out more quickly with a bit of nature left in it. The wash down stage is when you wish your house had better water pressure and you wish you had a better clean out pump. This step can take minutes or hours, depending on your setup.
Step Seven – One Last Look
O.K., the rocks have been washed, the plants have been cut or thinned, the muck has been pumped out and all debris is long gone. This is a great time to check all of the lights in your pond. Replace any bad bulbs and repair or replace any leaky or corroded fixtures. This is much easier when the pond is empty than when it is full. Once all of the lights are working and placed where you like them, take a few minutes to once again reset any rocks that you may have moved while cleaning and make sure to once again move the gravel up to the upper shelves if there is more than 2″ at the bottom. Look closely, this is a great time to cover up any exposed rubber and to bury any lighting wires that are exposed.
Step Eight – Fill Er Up!
Now that the pond is nice and clean, it is time to fill it up. We usually just let the garden hose run in the pond and we also empty the water from the fish holding tank into the pond. We have a fairly large tank, so usually this is enough water to re-introduce the fish to the pond. Before you put the fish in, feel the water in the tank and the water in the pond. If it feels about the same, you are good to go. If it feels different, it may shock the fish. These Goldfish and Koi can only deal with rapid water temperature changes of one or two degrees. These fish are very adaptable and can handle very wide, gradual temperature swings, but rapid changes can kill them. Here in Wisconsin we usually clean our ponds in early spring, so it is usually not too hot outside at that time. If you live in a warmer climate or if you are cleaning your pond on a hot sunny day, you may have problems. The tank that you use to temporarily house your fish while cleaning may warm up and the contrast between the warm tank water and the cold tap water may be enough to kill the fish. If the tank water feels too warm, run the hose into it a bit to gradually reduce the temperature in the tank until it feels the same as the pond water. To avoid trouble, always keep your fish storage tank in the shade, clean you pond in Spring or in the evening or early morning when temperatures are cooler, use the largest tank that you can find, finish your clean out as quickly as possible to minimize their time in the tank and always pump the water from the storage tank into the pond as you add the fish. Remember, if you are on city water and not a well, your water is probably chlorinated, so you’ll need to add a dechlorinator to the water before adding the fish. Once the fish are in and the pond is filling you are almost home free.
Step Nine – Putting It All Back Together
While the pond is filling and the fish are busy checking out their new clean digs, is a great time to install your pump and put all of the previously cleaned filters back into the biofalls and skimmer.


We put a mini barley bale or two below the filter pads in the biofalls of every pond that we clean. Barley is supposed to help control algae, so we figure it is work a try. When putting the filters and media bags back into the biofalls, it is important to take your time and place them in such a way that the water is forced through the filters and media as much as possible. Make sure that there aren’t any gaps in the corners where the water could easily rush past the filters instead of through them. Before you put the pump in the skimmer, reach to the bottom of the skimmer box and try to remove any remaining gravel or debris which may get sucked into your pump. Also, it is a good idea to give the pump’s impeller a few spins prior to plugging it in. This will loosen up any sticky parts from the long winter. You should even plug in your pump momentarily to make sure that it works prior to installation.
Step Ten – Enjoy!
All that is left to do at this point is to pack up your tools, add some beneficial bacteria to the water, wait for the pond to fill and plug it in. Then comes perhaps the most important part of the clean out. I think that after all of your hard work, you’ve earned a little rest and relaxation.
Go out by your pond, sit down next to it and enjoy the show. Enjoy the beauty of a freshly cleaned spring time pond.
Happy Pondering,
Doug